The IRCTC Windows Mobile Ticket Booking Application
The largest e-commerce entity in India, our very own Indian Internet superstar celebrity, the Indian Railways Catering and Tourism Corporation infamously known as IRCTC which lets you book/reserve tickets for trains of the Indian Railways has finally released an official mobile application on which you can buy their services. Why it isn’t called IRNWTBP or Indian Railways Non-Working Ticket Booking Portal is beyond me. Anyway, after their mobile ticket booking website, IRCTC has now another non-web interface by this app through which you can book tickets on your smartphone or PC running a Microsoft Windows 8 or above Operating System. Yes, only on Windows Mobile. No, there is no app for IRCTC ticket booking on Android or iOS (iPhone) or Blackberry or Symbian. The app was launched almost 6 months ago, but I could get around to writing a review only now. This post is a comprehensive review and user guide to the IRCTC Windows Phone Mobile application.
YOU CANNOT BOOK TATKAL TICKETS BEFORE 1200 WITH THIS APP!
Review of the IRCTC Windows Mobile App
The IRCTC Windows Phone app is extremely easy to use with an extremely straightforward navigation process. And moreover it is beautifully designed with near-perfect alignments, rich color combinations and a nice background image. The app has all necessary functions expected of it: Ticket Booking including train search and seat availability checking, booking cancelation, PNR check, booking history retrieval and so on.
If you are familiar with the usage of the IRCTC Web Portal, using the app is a breeze as it is essentially the same IRCTC on a different interface. All processes on the app follow exactly the same flow as those on the web portal. And given a good, stable 3G connection the app works even better than IRCTC’s internet version! Nothing much bad to say about the app per se, but if IRCTC goes down, the app will probably go down too. It does not work independent of IRCTC as it is only another interface. Please note that this is not an easy way to book Tatkal tickets. You cannot use the app to book Tatkal tickets at 1000 am.
What I liked about the app:
- Tile-based neat Design, Font, Layout, Colors. (Violet–Indigo–Purple–Magenta) Brilliant!
- Fast, simple, straightforward and easy-to use user interface and process flows.
- The train lists with their colored date boxes. PNR check, Cancelation, Reference etc possible from several places!
- The “Quick Book” and “Recent History tabs and the possibility of restarting failed reservations from the latter!
- All train-related functions present on the web portal (timetable, route map etc) are available on the app as well!
What I did not like:
- Cardinal IRCTC Curfew: The Windows Mobile app does not work from 0800 to 1200 hours. No exceptions.
- No synchronization between your online and app account versions. Your online IRCTC bookings can be viewed only through the internet and your app bookings only through the app. You cannot see all of them in one place!
- PNR Check/Cancellation is limited to tickets booked through this app only.
- Empty bottom right corner on the home page! OCD! Help!!
- The Credit Card details entry page. Also the OTP entry page, though the latter belongs to the bank.
Process of Getting Access to Use the IRCTC Windows Phone App
To use the app, you would need:
[box type=”warning”]
- A smartphone running Microsoft Windows Mobile 8 or 8.1 (Nokia Lumia).
- A hyperspeed superfast 3G mobile network and/or a reliable, strong WiFi connection.
- A working Microsoft Windows Store account connected to a Hotmail account.
- A verified and working account with IRCTC.
- A lot of patience. You will obviously getting a lot of Error Messages!
[/box]
First, you need to download the IRCTC App from the Windows Phone Store, which also can be directly accessed from the Windows Store App on your Nokia Lumia or other Windows Phone.
The TPIN Drama: Unfortunately nothing is ever easy or straightforward with IRCTC. You cannot just open the app and sign in with your userid and password. You need to generate a TPIN for this which will be the “password” to be used with the IRCTC Windows app and all other external applications. Getting this TPIN is another five step process.
[box type=”info”]
- Wait until it is after 1200 hours (noon).
- At this hour, log in to the IRCTC Website with your standard login user id and password.
- Click on the TPIN link and then on the “Generate TPIN” link on the blue sidebar on the left.
- Verify your mobile number on the page that appears and click on “Generate TPIN”.
- You will get your four-digit TPIN generated and displayed on the screen. You will also get it as an SMS on your mobile.
[/box]
PLEASE NOTE: You will be able to use the TPIN and hence the app installed ONLY on the phone which has the same mobile number registered with the IRCTC portal.
In case you are changing your mobile number for the phone you have installed the IRCTC app on, first update that new number in the “My Profile” section of IRCTC, then go to “TPIN” and “Change TPIN” and generate a new TPIN.
Using the IRCTC Windows Mobile App
You have downloaded and installed the IRCTC Windows Phone app and also have acquired the TPIN from IRCTC. Now comes the fun part. We are going to book a ticket! Yay!
LOGGING ON: On opening the app you get the login page where you can log on to the IRCTC system using your IRCTC user id and your newly generated TPIN. Then you will be told that “You are now “authneticated” user. We now set your profile.” So much of English fail in one single page! That too on an official app.
TIP: If you check the “Remember Me” box, you will not have to enter the user name and TPIN everytime you login.
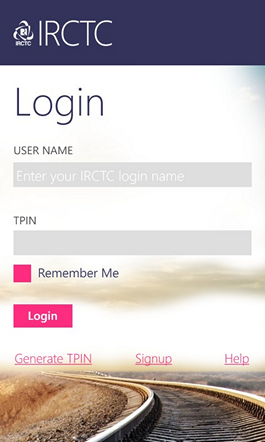


WARNING! It is going to be tough logging in most of the time! Your requests will invariably time out.
HOME SCREEN: Once you are in, you will be rewarded with the start screen which contains tiles (links) for everything you can think of, in one place! Plan My Travel, PNR Status Check, Booking History, Ticket Cancelation, Settings, Notifications and Passenger Info. It also has two tabs if you slide to the right: The Quick Booking tab and a tab showing a history of recent bookings you have made or attempted. The Home Page is nicely designed except for those two stupid tiles on the last row which hurts my brain thanks to my OCD!
How to Book a Train Ticket on the Windows Phone IRCTC App
It is pretty easy. Steps, process flow and screens used here are just like those on the IRCTC portal itself:
[box type=”shadow”]
State Preferences (Source, Destination, Date) > Select Desired Train and Class > Check Availability and Make Selection > Add Passenger Details > Confirm > Make Payment > OH HELL YEAH!!
[/box]
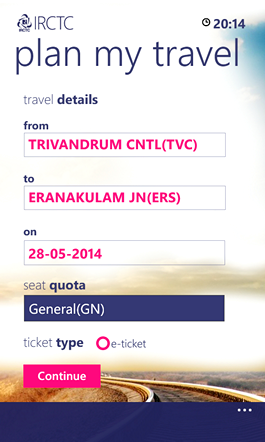
SETTING PREFERENCES: To Start, tap “Plan Your Trip“. You will get the “Plan My Travel” screen immediately. Enter source, destination and date of your intended journey. Type anything in the “source” and “destination” fields and the app will immediately show you all the station names and codes which contain those letters in sequence. So “TVC” immediately shows Trivandrum Central (TVC) and typing “TRI” will show all stations having “TRI” in their name or code. Here I wanted to travel between Trivandrum (TVC) and Ernakulam (ERS) on March 28 2014. The date can be selected through Windows Mobile’s standard date selection app. Click on “Continue”.

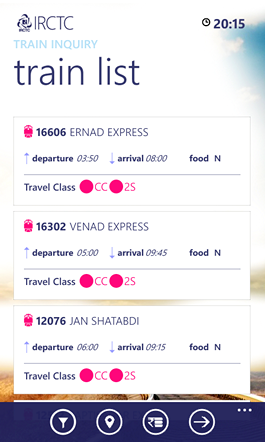
FINDING YOUR TRAIN AND CLASS: The next page, “Train List” will show all trains running between your source and destination on the date selected, ordered according to departure time. Each train is shown in a tile with the train number, name, departure from source and arrival at your destination, if food is included in fare and the classes of accommodation available for reservation. I was looking for the 12082 Jan Shatabdi Express that leaves Trivandrum at 1420 and arrives Ernakulam at 1800 hours.
More Goodies on the Train List Page
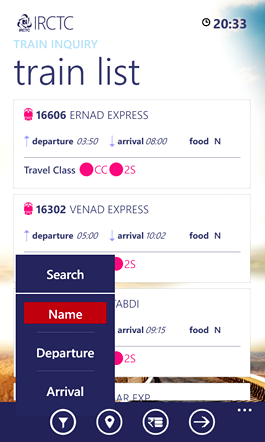
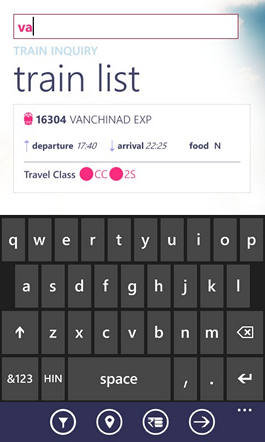
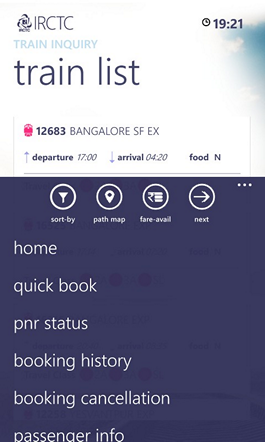
You can see three icons in addition to the arrow button on the bottom of the Train List screen. The first “Funnel” icon helps you easily find your train by letting you search the trains by name or sort all trains according to the train name, departure or arrival timings. Else you can also scroll through list to select your preferred train.
SELECTING YOUR TRAIN AND CLASS: After finding your train, touch the magenta circle next to your desired class of accommodation and a white circle will appear inside it, indicating that it has been selected. I was looking for the AC Chair Car on the Jan Shatabdi so I selected that.

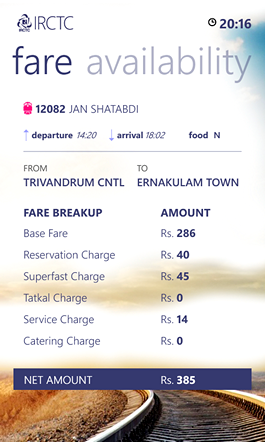
If you are in doubt, you can find some more details of your train in accordance to your selected class, source and destination. The “Pin” icon on the bottom bar will show you the time table of the train under train path and swiping towards the right, the path tab will show you your route on a map! The third “Rupee” symbol icon will show you the fare and swiping right, the availability tab will show you how many seats are available or in waiting list for the next 6 days.


You cannot forward your reservation from these pages as they are only information screens. To proceed further, you will have to go back to the train list screen using your phone’s back button. After verifying train and class selection, tap the right arrow on the bottom bar to go to the “live” seat availability page to proceed with your booking. On the web portal, all the previous screens and steps are on the same page.


CHECKING AVAILABILITY: The next (availability) page shows the number of seats available (or in waiting list) and fare for the next 6 days from the date you had selected for that train and class, just like on the web portal. Here I was lucky with 110 seats left in the AC Chair Car class. To confirm, tap on the tile for the day you want to travel. If you still do not want to proceed or try another train/class, press the back button on your phone. (The two screenshots here were taken at different times)
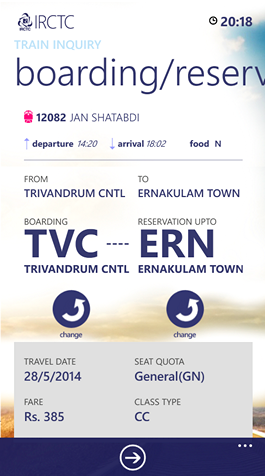
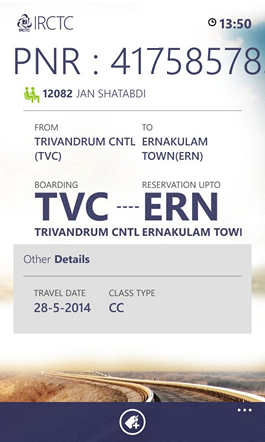
CONFIRM BOOKING: The boarding/reservation screen allows you to change boarding and destination points in case the train goes to another station in the city than your selected one. On clicking the curved “change” arrow you will get the list of all stops of the train and you can select another station. Since 12082 does not go to ERS, I selected ERN from the list, confirming that I will be traveling from TVC to ERN.
This page is my favorite with the large station codes and all, looks nice and high-end just like an airline ticket 🙂


ADD PASSENGER DETAILS: These are the actual forms where you enter your passenger details. Tap the “add adult+” tile to add passengers with name, age and seat/berth preference. For children below 5 years of age, tap the “add child+” link. You can add up to 6 adults and 2 children per booking. Your mobile number will be pre-populated, which you can edit if you want the SMS ticket to be sent another number. Further down you will also find the booking options you have in the web portal such as upgradation, same coach, LB preferences etc. This page is beautifully and richly designed with a perfect layout. Once you have added all your passengers and selected the appropriate options, click on the arrow on the bottom bar to proceed.
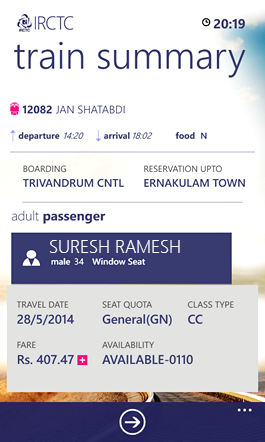
CONFIRMATION: Before you go in for that process which increases heart rates and BP all over India, payment on IRCTC, you will get a chance to review your train summary to confirm all that you have worked on till now. Take a deep breath and click on the arrow at the bottom. WARNING: This is the trickiest part and weakest link of the entire process, but you already know that. To payment!


PAYMENT: You will get a kind of finicky page which will show you payment options with a URL along the bottom. Initially you will see a blank white page for several seconds but DO NOT PANIC! Do not close the page unless you don’t get any response for a couple of minutes.
You can pay through Credit Card (VISA/MasterCard, Amex), Debit Card or Mobile Banking. Check the circle for the preferred gateway and you will be taken to a stupidly smallish page to enter your Credit Card details. Entering anything here is a chore and you have to be extra careful. Next up will be the card bank’s verification/OTP page which will be normal web page crammed inside the app. you will have to pinch and zoom to enter the OTP/PIN.
CONGRATULATIONS!! YOU HAVE DONE IT!!
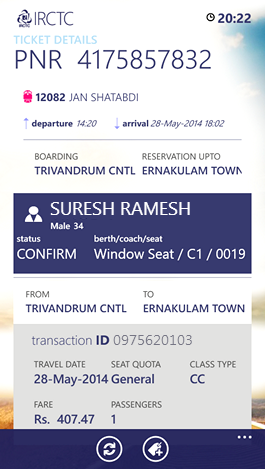
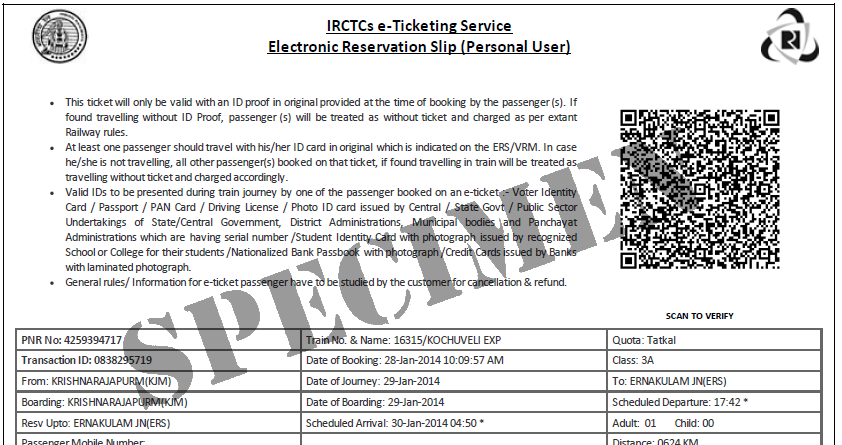
This is your ticket! You can take a screenshot of this to show the TTE (with valid ID).
Other Functions: PNR Checking and Booked Trains Lists
Select “PNR Enquiry” and a page with all tickets which have not been traveled will appear. Tap on the ticket whose PNR you want to check, thereby highlighting it. Click the arrow at the bottom of the page which will show you the ticket details on the first tab and the PNR status on the second tab, reachable by swiping left on the screen. You can also pin these PNRs as a live tile to your front page, from where you can come directly to this page to check your PNR status.


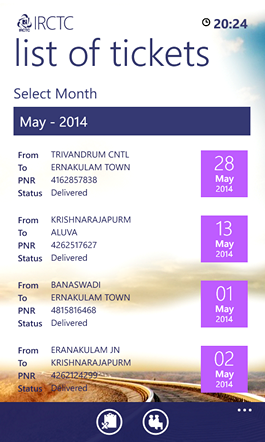
Booked Train Lists and Cancellation: You can either click on the “Booking History” tab on the home screen which will show you all tickets you had booked for a particular month (by dropdown). You can also check the PNR status or cancel a ticket from this screen as well (the two icons on the bottom) after tapping to highlight a particular ticket.
On the same “services” screen you can swipe sideways on the same screen to show a “Recent History” tab which will show you all booking attempts you had made in the past two months! Tapping on any of these will open the booking windows again! This is especially helpful if some of your processes had failed, you can start off again from where you had left off!


How to Cancel a Reserved Ticket on the IRCTC Windows Phone App
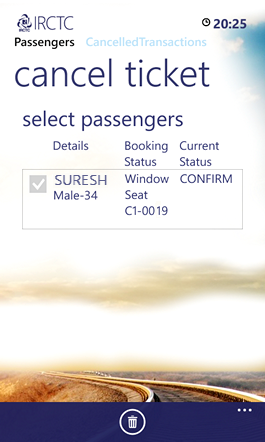
Only tickets booked through the app can be cancelled though it. Also, tickets booked through the app can be canceled only through the app! The process is even simpler. Just go the “Booking Cancellation” or booking history tiles on the bottom of the services home screen, find the ticket you want to cancel, tap to highlight it and click the “clipboard with the x” icon on the bottom. On the next screen, just like on the webpage, select the passenger you want to cancel and click on the garbage can button on the bottom. You will shown the cancelation status, amount to be refunded etc.
Quick Book, Add Passenger Info and the Three Dots
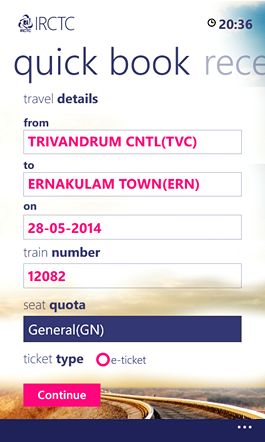
If you know the train number you want to travel in, you can avoid one step, that is the search for trains. This will work considerably faster since the system will not have to search for the trains. You will be shown only one train, the train you gave the number for on the trains list page. From there, everything goes on as before. You can use the add passenger button to add a list of default passengers who you can add easily while making reservations. On every page, you will also find three dots at the bottom right of the page. This will open up a slide up which will contain a link back to the home page and all the options you can find on the home page.
Conclusion and Verdict: Brilliant!
Will this app reduce the pain of booking tickets? Mostly it will not, because the number of Windows phone users is comparatlvely lesser. But I loved the experience. One thing I would really like to see on the IRCTC Windows Mobile app though is a live tile which shows current PNR status on the phone’s main screen. Rest assured, I will be doing most of my booking on this app from now on!
Why didn’t they launch this app on Android and iPhone? Of course, to reduce the traffic to IRCTC!
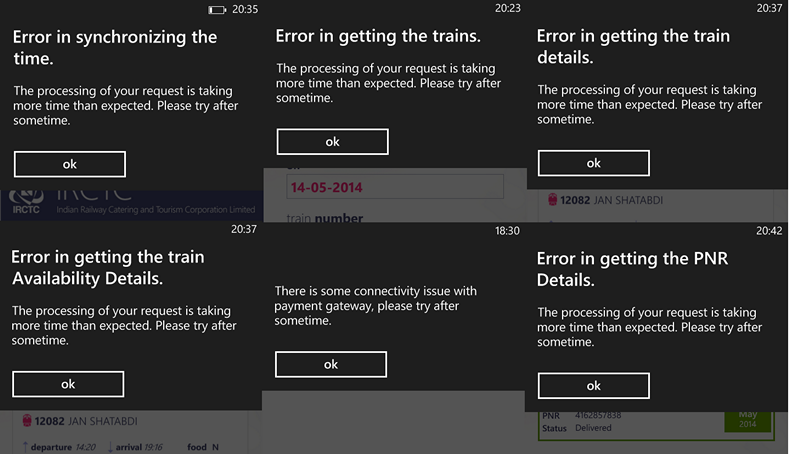
And of course, there is no IRCTC without its mandatory error messages which might greet you at any stage. Finally, here is a collage of error messages I complied. When you get an error message, just click OK and try again.
[divider]
DISCLAIMER: All logos, pictures, images and screenshots used here are all fully owned, registered copyright and trademark of the Indian Railways and Indian Railways Catering and Tourism Corporation Ltd. These have been used here for representative and illustrative purposes only. I do not claim ownership for any of these images represented here. All names and PNR numbers used here are fictional.

