How to Book General Train Tickets Using the UTS App

In this so-called digital age when nearly everything is online and especially so India which is in the midst of a digital revolution, it is sad to know that most people still do not know that almost all functions and applications of the Indian Railways are available online. Of course, we all know about IRCTC and how to book reserved tickets online using both the app and the website, and we can now know the location of any train on the network in real time.
What no one seems to know is, unfortunately, that just like reserved tickets, we also have an official Indian Railways smartphone app to buy even unreserved (general) tickets! Yes, the kind of tickets printed on dot-matrix paper for which we queue up to buy from station counters for everyday travel in general second class coaches. It is called the UTS (Unreserved Ticketing System) application, and is available on Android and iOS platforms. The UTS app can be used to buy general second class train tickets and season tickets for any route on any train across any zone and also platform tickets for any station on the Indian Railways network.
The Indian Railways UTS (Unreserved Ticketing System) application
It is ridiculous to see ultra-long queues at ticket counters with even the “techie” types all clutching smartphones and anxiously looking over the shoulder of the person ahead while “arriving shortly” announcements blare over the loudspeaker. For most, the “digital revolution” seemingly starts at Facebook and ends at Whatsapp via Instagram. It would be great if people used their smartphones for something to help themselves rather than Mark Zuckerberg.
This chapter will present a step-by-step guide on how to install, register and use the UTS app to buy general or unreserved tickets using your smartphone instantly. You will never have to go and stand in a railway ticket counter queue ever again! The way the UTS app works might be a bit confusing for some, but actually it is quite simple. The initial set-up process will take some time and focus, but once that is done, you can buy general/unreserved tickets in a few seconds. Oh and it is not just time-saving and convenient but cheaper as well! You get a 3% flat discount if you buy train tickets on the UTS app. Let’s have a look how it works.
Note: You cannot reserve seats or buy Sleeper or AC tickets (even unreserved / SLUR) using the UTS app.
First, you need to create Your UTS account
There are two ways to create and register your UTS account: on the app itself or on the UTS website. You will have to provide your mobile number, your name, gender and date of birth. After registration you will receive an SMS with an MPIN which will also be your password to your UTS account. You can change this password later. Once you have registered you will be presented with the login page of the app. You can log in using your mobile number and the MPIN you just received. Then you will be presented with the menu of options.


Next, set up the UTS app to book tickets
(Note: If you are a one-time traveller looking to buy a ticket for just once like in six months, it is recommended that you skip these steps and go directly to the “Normal Booking” option. If you intend to travel on trains in General compartments more than once a month it is recommended that you follow these steps to set up your app to be used in Quick Booking mode.)
To use the app to its maximum efficiency it is recommended that you do a one-time set up so that in future you can buy tickets within seconds. This involves setting up the prepaid payment option and saving all your frequently travelled routes.
Configure the payment option for the UTS App: The R-Wallet
The R-Wallet is a prepaid (rechargeable) digital wallet unique to the UTS app. The wallet is created automatically and linked to your UTS account during registration. The wallet has to be preloaded or recharged with cash that can be used to pay for tickets using one click. It is super convenient. You can also pay for tickets the conventional way using payment gateways though.
Recharging the UTS R-Wallet: You can load (recharge) your R-Wallet using the “Recharge Wallet” option under the “R-Wallet” menu item on the UTS app’s main menu or on the UTS website. The payment options are Internet banking, debit cards or UPI, or choosing from either PayTM, MobiKwik or Freecharge Wallets. For some reason you can’t use credit cards directly. The minimum recharge amount is Rs.100. It is recommended that you load your account with Rs.1000 if you are a frequent traveller and Rs.200 if you are an occasional traveller. You can also view your recharge history using the menu. You will get a 3% discount on all your recharges.
Credit Card hack: If you have a PayTM/Freecharge wallet you can use your credit card to load these wallets, and then log in to them from the R-Wallet recharge page to transfer the wallet balance to the R-Wallet free of charge. This is especially useful if you hold AMEX or Standard Chartered cards.
Now, save your frequently travelled routes for quick access
This is to make things easy for “Quick Booking” tickets with a couple of clicks on pre-saved options without having to go through the entire process of selecting stations and fares every time.
- Select the “Profile” option from the main menu.
- Select “Change Frequent Travel Route” from the profile menu.
- Click on the + Icon on the bottom right corner to add a route to the list.
- Enter the From and To stations you frequently travel, click “Search Routes” and from the results, click the > icon on the next page to save the route.
- The route details you entered will now appear when you either “Quick Booking” modes.
- You can add up to five frequently travelled routes.
We are now all set to book tickets. Before we start, there is another technicality you should be aware of.
Paperless and Printed ticket modes
Though the ticket is purchased and paid for using the app, Indian Railways gives an option for the user to either get the ticket digitally displayed in the app (“Book and Travel” mode) or to print it as a paper ticket using the ATVM/CoTVM machine at the station (“Book and Print” mode). The user can select the mode they want while booking the ticket. We will get to that shortly.
Both these modes are present for general tickets, platform tickets and season tickets. It goes without saying that the “Book and Print” option is quite redundant, unless you are sure your phone will run out of battery or you need a physical ticket to be presented somewhere. For the ease of use and to avoid confusion, we will be considering only the “Book and Travel” paperless mode.
The paperless mode requires GPS to be turned on and working. Please note that this mode will NOT work while you are inside stations, trains or near/at railway tracks. The intention of this mode is to make sure tickets are not purchased while inside railway stations or trains. Stand some distance away (around 10 metres) from the station while buying your ticket. You need to be within five kilometres of your journey originating station. The “Printed Ticket” option is not GPS-constrained.
Options to book unreserved tickets using the UTS app
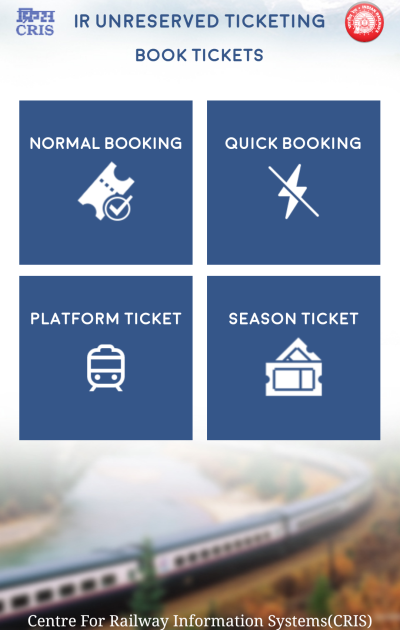
There are two methods of to buy regular journey/travel unreserved tickets on the UTS app. Click the “Book Ticket” option and you see the following options:
- Normal Booking – For one-time purchases of tickets. Recommended for the very infrequent traveller.
- Quick Booking – For the frequent traveller. Allows you to save regularly travelled routes on the app and buy tickets with one click.
- Platform Ticket: to buy Rs.10 platform tickets.
- Season Ticket to purchase monthly or quarterly season tickets.


Quick Booking option – For frequent travellers
“Quick Book” helps frequent travellers to quickly book tickets in a few clicks without going through all these steps every time. If you just want to buy a ticket one-time you can skip the “Normal Booking” option. You still need to be within 5 km of the station and 10 m away from the tracks.
- Click on the “Quick Book” and then the “Book and Travel (Paperless)” option on the app.
- You will be shown the list of your saved travel routes in the app. Select your required route.
- Next, select the number of passengers (one to four adults or children), ticket type (Journey), train type (Express only), Class (Second only) and Payment type (R-Wallet or Payment Gateway).
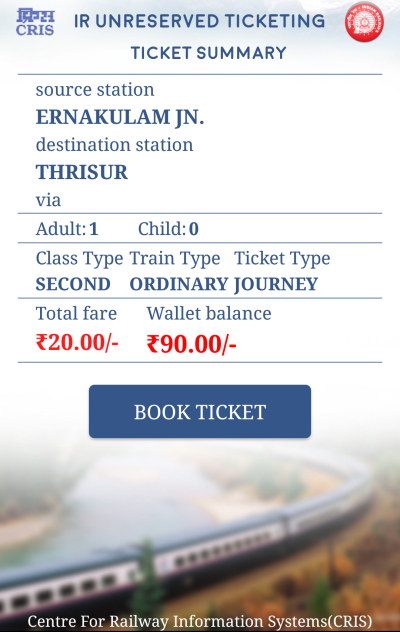
- You will see a ticket summary and confirmation screen. Click on “Book Ticket” to buy your ticket. The fare will be deducted from your R-Wallet and your ticket will be issued immediately. If you had selected “Pay Using:- Credit Card… etc.”, you will be taken to the Payment Gateway page to make your payment.
- You will be shown a confirmation screen with the booked ticket details. This is not the ticket. Go to the main page and click the “SHOW TICKET” option to view the ticket. Every day the ticket will be of a different colour.
Normal Booking option – For infrequent travellers
This option may be used to buy the usual second class train ticket and is optimum for the very infrequent traveller on that route. The ticket can be paperless or printed.
- Select the “Book and Travel” mode. You will be presented with the page to select the “From” and “To” stations. The GPS will identify all railway stations near to you (within 5 km) and populate the “From Station” field with a drop down list of those stations. Select the station you are boarding from. You cannot enter anything else in that field. You can enter any station in India in the “To Station” field, though. Click “Done”.
- select the number of passengers (one to four adults or children), ticket type (Journey), train type (Express only), Class (Second only) and Payment type (R-Wallet or Payment Gateway).
- You will see a ticket summary and confirmation screen. Click on “Book Ticket” to buy your ticket. The fare will be deducted from your R-Wallet and your ticket will be issued immediately. If you had selected “Pay Using:- Credit Card… etc.”, you will be taken to the Payment Gateway page to make your payment.


Congratulations! You have successfully booked and bought your ticket. You don’t require a printout of this ticket. When the TTE/ticket checking staff appear doing the journey, just open the app and tap on “Show Booked Ticket” button on the home page itself. The latest ticket your bought will be displayed on the screen. You don’t even have to log in to the app.
Buy platform tickets using the UTS app
You can buy a digital or a printed platform ticket of Rs.10. The paperless mode automatically identifies stations near you and allows you to purchase a ticket for those stations.
Buy/renew season tickets using the UTS app
Monthly or Quarterly season tickets for all over Indian Railways network can be bought or renewed using the UTS app. The ticket can again be Paperless or Printed and the display of the ticket will work the same way as before. The difference here is that there is no GPS involved here. For either mode you can directly enter your From and To stations and you can book either from anywhere.
- Enter your Source and Destination stations.
- Select the Season Ticket type (Monthly or Quarterly), Train type and payment method.
- Provide your Name, Date of Birth, Gender, ID Card type and number and address.
- Confirm your details and make payment.
- Your season ticket is ready! Take a printout if you booked with “Book and Print” mode.
Note these points
- All e-tickets booked using the UTS app are perfectly valid for travel. They are as good as any paper tickets.
- You cannot take screenshots of booked tickets. Screenshots/photos are not valid tickets. The ticket HAS to be displayed on the app on the mobile screen. Make sure your phone does not run out of battery.
- “Booking history” is only for user reference. They will not be considered a valid ticket.
- You will not lose your tickets when you change your smartphone handset. Please select “Handset Change Request” in the main menu if you want to change your handset. The phone number must remain same, though.
- Fill in all details in the Profile section of the main menu, especially if you are buying a season ticket.
- The initial process of setting up the application can take up to around half an hour.
- It is recommended to use the “Book and Travel” (Paperless) mode as much as possible. ATVM machines more often than not won’t be available, won’t work, will be manned by unpleasant contractors and you will have to again stand in queue which kinds of defeats the whole purpose, etc.
- All wallet and profile services on the app are available on the UTS website also.
- Sleeper or AC tickets (even unreserved ones) can’t be purchased using the UTS app.
It is 2023. Do not stand in queues to buy a train ticket. Happy Journey!
The images and screenshots of the UTS app fully belong to CRIS and Indian Railways and are depicted here for illustrative purposes only. All logos and trademarks are property their respective owners alone. This blog post is purely intended to be a guideline to build awareness about the UTS app and to help people use it. This website has no affiliation whatsoever with the Indian Railways. The official website of the Indian Railways is http://indianrailways.gov.in.


